Protocol of transfer of computer equipment
IT equipment handover and return protocols in 20 seconds
Table of contents
1. Types of protocols
2. Content of protocols
3. Automation of the protocol preparation process in the eAuditor system
4. Time to generate protocols for employees in eAuditor system
5. Input data for protocols in the eAuditor system
6. Handover Protocol (PP) in the eAuditor system
7. Return protocol (PZ) in the eAuditor system
8. Protokół zwrotu + protokół przekazania w systemie eAuditor
9. Other methods of generating protocols in the eAuditor system
10. Printing of protocols
Here you will find answers to the questions
- What equipment handover protocols are necessary in the IT department and what information should they contain?
- How to generate IT equipment handover protocols quickly and easily?
- How to quickly generate IT equipment return protocols with simultaneous handover to a new employee?
- How to use computer and user monitoring to generate protocols?
- How to link the generation of a protocol to the physical assignment of a device to an employee?
- How to automate the process of transferring and returning IT equipment?
- How long does it take to generate protocols in the eAuditor system?
Making IT administrators’ jobs easier
Preparing protocols for handing over equipment to employees and the subsequent process of “policing” equipment movement is very time-consuming and cumbersome. Unfortunately – for formal reasons – it is recommended and required. According to our survey of several thousand organizations, many entities abandon the preparation of protocols due to the lack of sufficient human resources in IT departments and the automation of these processes. This makes it possible to document a lot of paperwork especially at the time of inspections related to the transfer of equipment.
Types of protocols
The basic types of protocols (the absolute minimum) are the computer equipment handover protocol and the computer equipment return protocol.
The eAuditor system supports the following types of protocols:
- PP – Equipment Handover Protocol (related to the assignment of property to an employee),
- PZ – Return Protocol (related to taking back the equipment from the employee),
- PZ + PP – Return Protocol + Transfer Protocol.
Key assumptions
In order to maintain consistency and logic in the IT asset management process, the following assumptions should be made:
one protocol can contain multiple items (we can issue several items at one time),
one employee can have multiple protocols (different equipment issued at different times),
one item of equipment can be issued to only one person at a time (only one employee is responsible for a resource at a time),
generation of a protocol document results in the automatic creation or deletion of an employee – equipment relationship (such a mechanism ensures that you always know what equipment is at the disposal of an employee and to whom the equipment belongs),
the protocols can be modified at any time (when there is a need to add, for example, comments on the issued or given computer equipment),
data in the protocols reflect the actual values at the time of generating the document (historical records should be kept),
protocols can be printed at any time (e.g., you can print a historical protocol).
Content of protocols
The protocols contain employee-device relationships, resulting in corresponding dependencies in the eAuditor information system.
The absolute minimum are: Transferor, Receiver, Date, Equipment ID (e.g., inventory number), serial number, signature of the transferor, signature of the receiver.
The protocol should have space for comments on the equipment item, on the entire protocol, and the possibility of attaching selected attachments. Attachments can be photographs, notes, repair reports, a statement of defects or comments of the returning party.
The protocol in the extended version can additionally contain a 1D or 2D barcode. In the eAuditor system, the type of printed code depends on the global settings in the system configuration. You can change the type of code at any time, and the system will rebuild all previously generated codes.
The protocol can also include:
- the accounting value of individual items at the time of transfer (release),
- a legal note on the responsibility of the employee,
- instructions on what to do in case of loss or damage to the equipment.
Automation of the protocol preparation process in the eAuditor system
It is possible to use the functionality of generating protocols in the eAuditor system in different ways:
- Equipment records in the eAuditor system (manual, automatic, imported) – the next step is to prepare equipment handover protocols for employees with automatic assignment of equipment to employees.
- Equipment inventory in the eAuditor system by assigning equipment to employees based on the built-in assignment suggestion algorithm (assign equipment not assigned to recent users) – this is followed by verification and generation of handover protocols.
- A mixed model using both of the above options.

Time to generate protocols for employees in the eAuditor system
The eAuditor system’s protocol generation functionality is designed to minimize the time required to prepare and print a protocol, while keeping the process as automated and widely configurable as possible.
It takes less than 20 seconds to prepare and print a single protocol.
Input data for protocols in the eAuditor system
In order to generate protocols, you need to:
- have in the eAuditor system the data of employees using the computers (e.g., synchronization with Microsoft AD enabled) in terms of “First Name”, “Last Name”. These will be used as data of the person receiving or returning the equipment,
- have an (optional) enabled mechanism for monitoring USB devices (in case other devices are to be included in the protocols, e.g. USB mass storage devices, cameras, phones, etc.). The use of this mechanism will allow to suggest the contents of the item in the protocol against each employee and each resource.
Equipment transfer protocol (PP) in eAuditor system
To create an equipment transfer protocol, you need to:
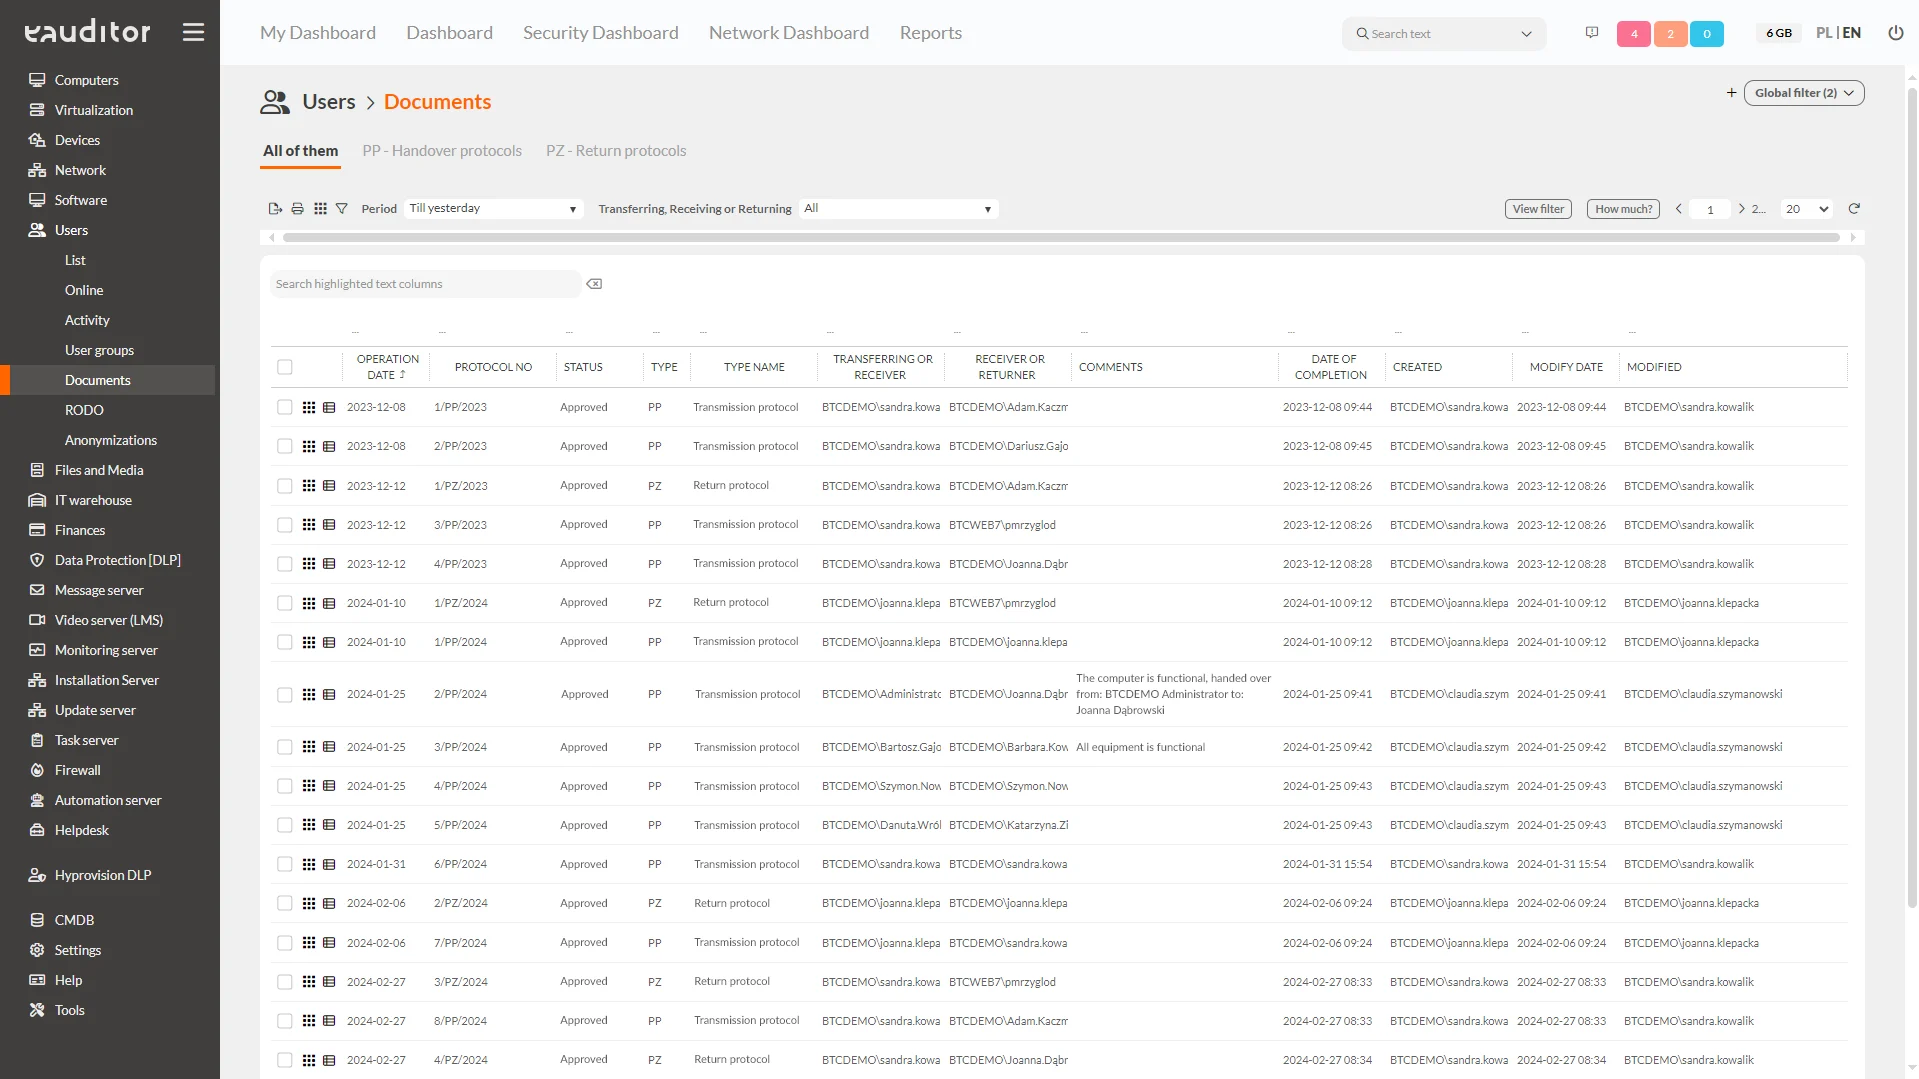
- Go to the Persons > Persons view and select the person. The “Documents” section contains a list of all generated documents. If there are no documents, the section will be empty.

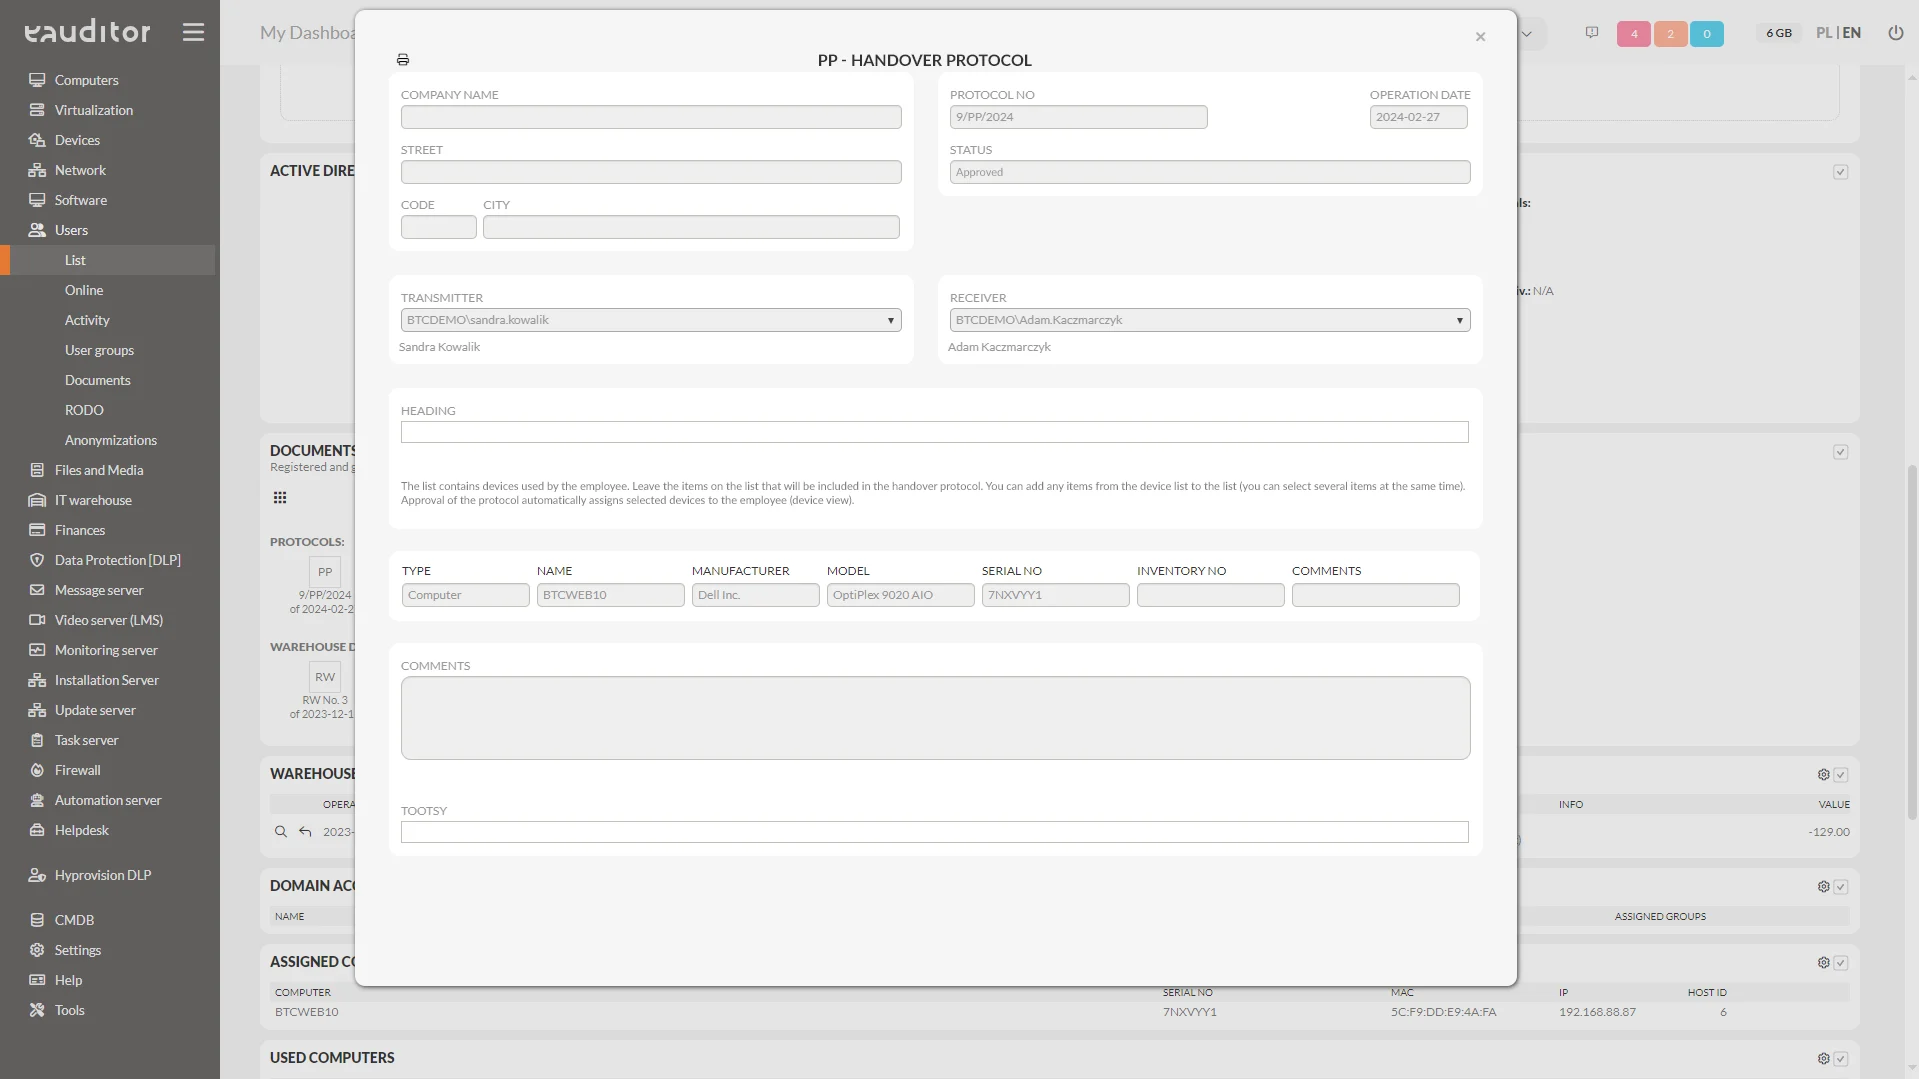
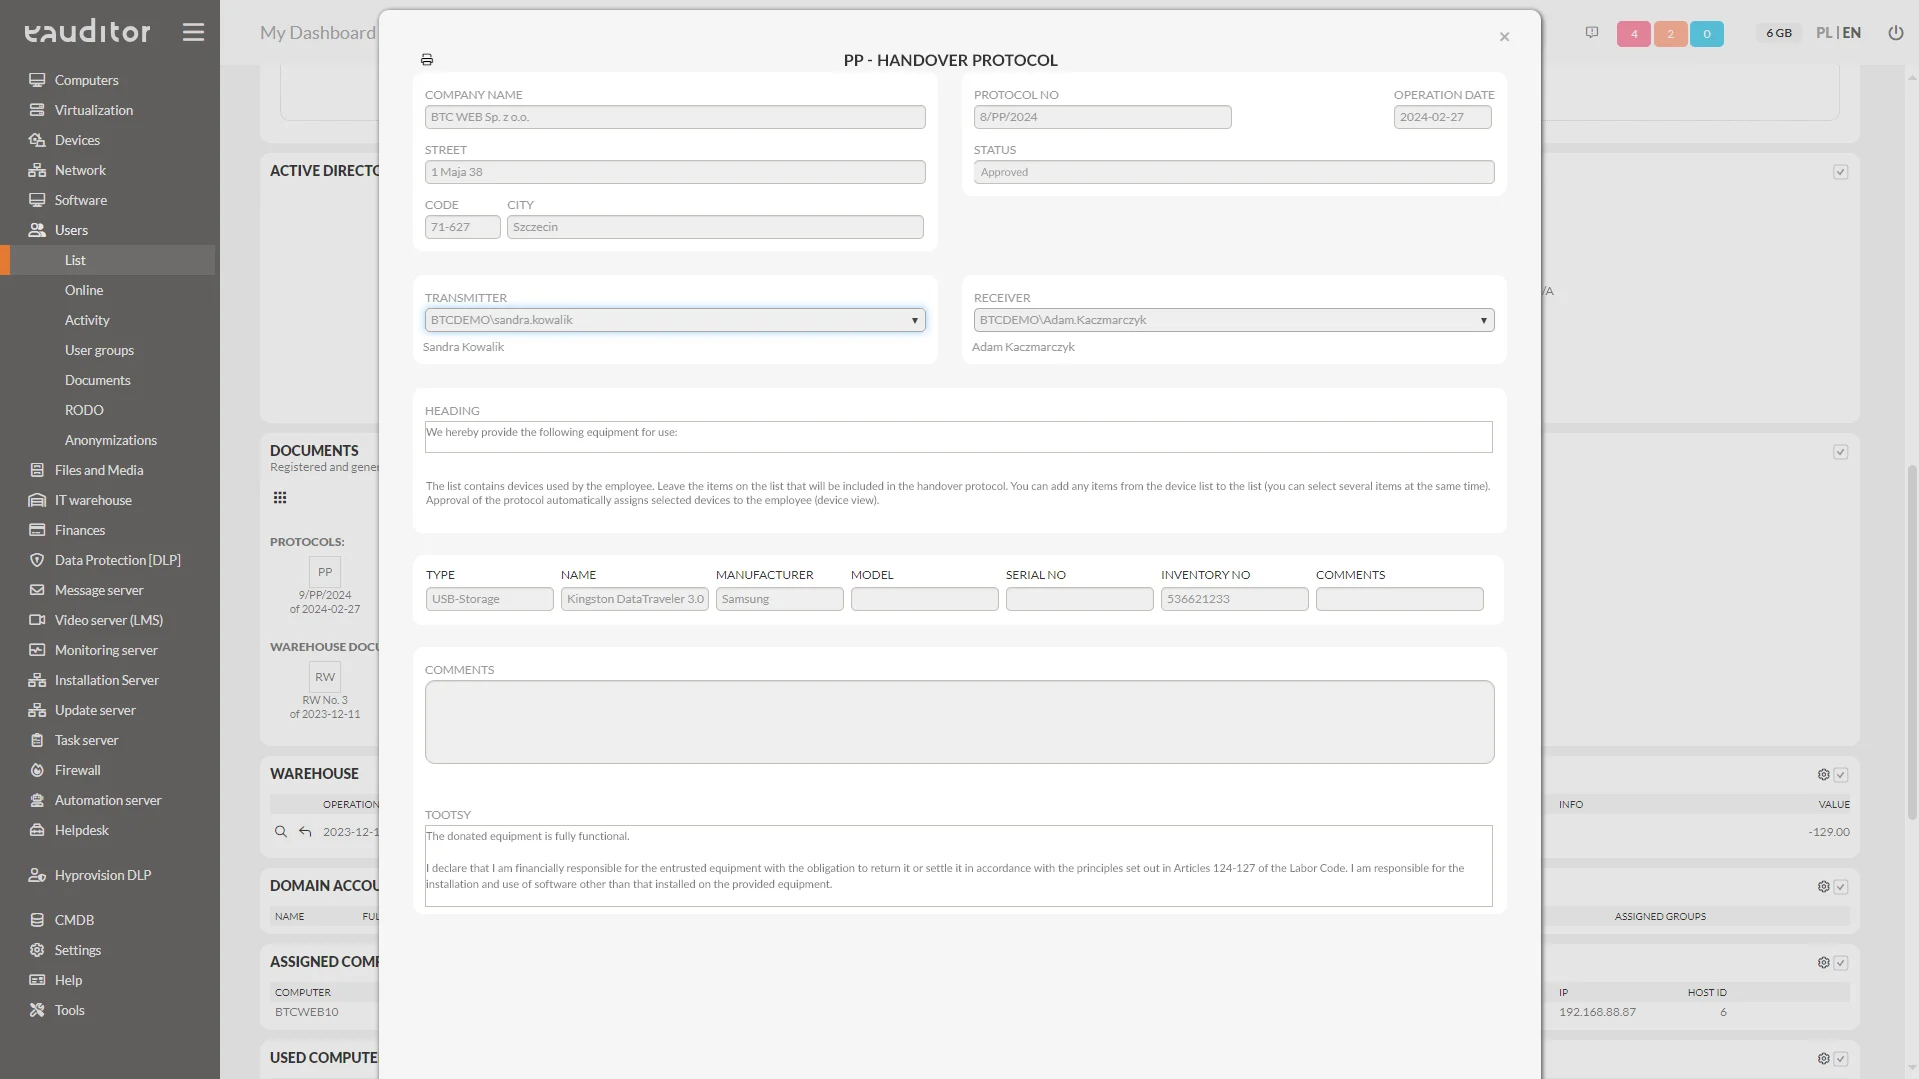
- Select the “PP – Create handover protocol” option from the tab of the “Documents” section. The system displays a mock-up of the handover protocol with the elements:
– document name,
– document number (automatically generated),
– status (approved, not approved),
– entity name (changing the name will save for use in future documents),
– transferor (the system prompts for the data of the person logged into the system),
– receiving (data of the person receiving),
– header (document header and header content will be saved with the document),
– list of devices in the protocol. The list includes appropriately labeled items: devices already assigned to a user but not appearing in the protocol, devices used by a user but not issued to another user. Any devices that have not yet been issued can be added to the list.
– comments – a place to enter comments on the protocol,
– attachments – any attachments, such as photos, invoices, minutes and notes,
– footer (document footer and footer content will be saved with the document).
- Update the document template (it can be a sales document, for example) by filling it with the necessary content, date, attachments and equipment items.
- Save the document. Saving the document results in the creation of the document in the document repository (People > Documents section) and the automatic assignment of devices from the protocol to the user.
Note: Devices issued with a PP protocol will not be able to be issued to another employee without first generating a return protocol (PZ). The saved document can be viewed in the employee’s document list, in the devices view, in the computers view and in the documents list.
Return protocol (PZ)
To create a return protocol, you need to:
- Go to the Persons > Persons view,
- Enter the “Documents” section. The section contains a list of all generated documents,
Select the “PZ – Create return protocol” option. The system displays a mockup of the return protocol with the elements:
– document name,
– document number (automatically generated),
– status (approved, not approved),
– name of the entity (changing the name will save for use in future documents),
– acceptor (the system prompts for the data of the person logged into the system),
– returning (data of the person returning),
– header (document header and header content will be saved with the document),
– the list of devices in the protocol built based on the current state of the employee. If the employee received equipment at different times (multiple handover protocols), the list will show items from all protocols with the protocol number and the date of the protocol,
– comments – a place to enter comments on the protocol,
– attachments – any attachments, such as photos, invoices, minutes and notes,
– footer (document footer and footer content will be saved with the document).
- Update the file by filling in the necessary content, date, attachments and selecting the items that the employee returns.
- Save the file. Saving the document results in the creation of the document in the repository and the automatic disconnection of devices to the user.
Note: These devices will be able to be issued to another employee. The saved document can be viewed and printed from the employee’s document list, in the devices view, in the document list.
Return protocol + transfer protocol
In order to create a return protocol, you need to:
- Go to the Persons > Persons view,
- Enter the “Documents” section. The section contains a list of all generated documents,
- Select the “PZ+PP – Create return protocol and transfer protocol” option. The system displays a mockup of the return protocol with the elements:
– document name,
– document number (automatically generated),
– status (approved, not approved),
– entity name (changing the name will save for use in future documents),
– transferor (the system prompts for the data of the person logged into the system),
– returning (data of the person returning),
– receiving (data of the receiving person),
– header (header and header content will be saved with the document),
– the list of devices in the protocol built on the basis of the employee’s possession. If the user received equipment at different times (multiple handover protocols), items from all protocols will appear in the list, along with the protocol number and the date of the protocol,
– comments – a place to enter comments on the protocol,
– attachments – any attachments, such as photos, invoices, minutes and notes,
– footer (footer and footer content will be saved with the document).
- Update the document by filling in the necessary content, date, attachments and selecting the items that are returned by the employee at the same time will be issued to the other employee.
- Save the document. Saving the document results in the creation of two documents in the repository (PZ – Return Protocol and PP – Transfer Protocol) and the automatic disconnection of equipment from the returning employee and assignment to the receiving employee. The saved file can be viewed in the employee document list, in the devices view, in the document list.
Other methods of generating protocols in the eAuditor system
Protocols can also be generated from other options (locations) of the system:
- from the device list view,
- from the computer list view,
- from the computer detail information,
- from the device detail information.
Depending on where the document is generated, the system prompts for one or multiple devices/computers. For example, in a situation where you generate a protocol (PP) from the computer detail information, the protocol will include the default selected computer and all unreleased devices so far, which are assigned to this device. The list of protocol items is modifiable.
In the case of the generation of a return protocol (PZ) from the computer list, a list will be displayed in the protocol containing the returned computer and other issued devices associated with the computer. The list can be modified, such as supplementing with additional items or excluding selected items.
Printing of protocols
Created protocols are saved to the repository at the time of their creation, so it is possible to historically print the protocol and it will be the same as the previously printed original.
Minutes can be printed from:
- the minutes repository (People > Documents),
- preview of a given protocol,
- device detail information,
- computer detail information.
Reports (printed protocols) are available in two versions: basic and extended. The contents and layout of the protocols are modified via the SAP Crystal Reports editor.